Tuesday, December 27, 2011

Stocking Stuffers: Monogram Mugs


For my brother and his lady, I made personalized mugs. I picked these up at Goodwill:


Then I followed the tutorial at Design Mom (found via SouleMama).


When I went to get the Pebeo pens, they were out of the fine tip in black, so my lines are a lot thicker than the original tutorial. But I really like how they turned out.


And most importantly, the recipients love them!


These mugs were so easy and fun to make, that now I have grand plans for many, many more next year at Christmas.

Sunday, December 25, 2011

Merry Christmas!


Wishing you and yours a very Merry Christmas! I've been busy making, making, making this month, and now that Christmas has arrived I'll be able to show you all that I've been working on.  Enjoy your Sunday!

Friday, November 11, 2011

Friday, November 4, 2011

{this moment} - fireside knitting


{this moment} - A Friday ritual. A single photo - no words - capturing a moment from the week. A simple, special, extraordinary moment. A moment I want to pause, savor and remember.
If you're inspired to do the same, leave a link to your 'moment' in the comments for all to find and see.

Wednesday, November 2, 2011

A Belated Happy Halloween!


I hope you all had a wonderful Halloween! We have been busy, busy, busy around here, hence the long blog silence. But we've been having a lot of fun!


We got the house all decorated for Halloween.


And we picked out some pumpkins at the Farmers' Market.


The three little black and white bats I commissioned about two years ago from Squirrel Momma on Etsy (aren't they cute?!).


And the equally cute grey, black, and purple bats are Duckie Uglings. (Becca Jo's the one who taught us at my penguin party).


My guy and I looove holidays, and any excuse to give each other gifts. Here's my pile for him:


I made the wrapping paper with a bat stamp. (I love making wrapping paper).


My gifts for him included this sweet little magnet from Marisa of Creative Thursday:


As well as some Halloween books and candy, and some homemade gifts as well. The homemade gifts included the ghost wreath, the watercolor leaf (finally framed!), and this little painting:


While we opened our Halloween presents we had this wine. I bought it a few years ago when I was in Michigan with my brother. I've been saving it, but the label seemed so perfect for Halloween that we opened it up on Monday night.


But before we had our gift exchange, we went to dinner at my parents' house with some family friends. We all took turns handing out candy to the trick-or-treaters.
I made the place card settings for dinner (inspired by Martha Stewart). First I started with six little pumpkins:


I made a bat wing template and then traced around it twelve times on black cardstock. I cut out the bat wings and taped them (fancy, I know!) to the pumpkins.


I used one of my paper punches to cut out more black cardstock for our names. I decided they looked a little like tombstones, so I added 'RIP' above our names, then tied them to the pumpkins with orange ribbon.


Here's the table at my parents', set for Halloween dinner:


Lentil soup.


Meatloaf, mashed potatoes, and cabbage.


The little velvet pumpkin that I gave to my mom.


We also carved pumpkins and roasted pumpkin seeds, but this post is already really long! So I may have to share a few more Halloweenish things later this week. For now, you can check out last year's pumpkins right here.

Wednesday, October 19, 2011

Fall Leaves Watercolor


Watercolor oak leaf on a book page. Inspired by this craft (via). The owl is super cute, but I was especially drawn to the leaves in the background.

I can't draw too well, at least not in a realistic way, but I just recently got this coloring book (from here):


Lovely, detailed black and white leaves of all kinds in varying sizes. I chose an oak leaf, and used my lightbox to trace the leaf onto a book page with pencil.


(I have a number of old, falling apart books that I keep in my craft room for this very purpose. This page happens to be from an old linguistics book. As a not-terribly-interesting side note, I actually majored in linguistics in college - though this particular book is something I acquired later, for crafting).


Once the leaf was traced in pencil, I went over it with a fine tip pen (a Uniball pen - I love these pens - that is great for use with watercolors. It doesn't run).


Then I used various shades of orange/yellow/brown to paint in the leaf.


The colors aren't as dynamic on the screen as they are in real life. But let me tell you, I am so pleased with how it turned out. I need to figure out what I want to do about framing, and then it's going to be a gift for my guy. Oak trees are his favorite.

Monday, October 17, 2011

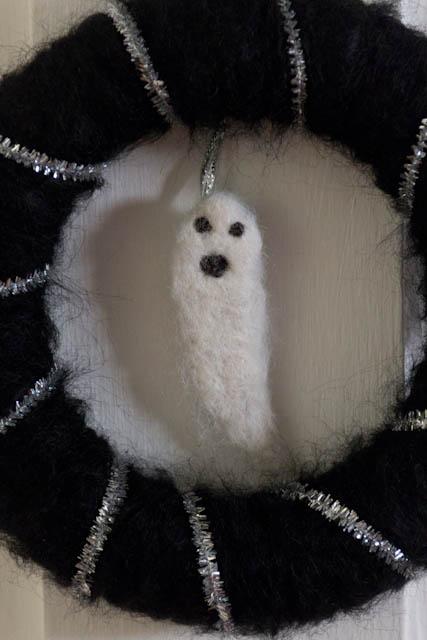
How to Make a Halloween Ghost Wreath


So I hadn't actually intended to make a wreath; I set out to simply needle felt a ghost. After I had made the needle-felted acorns, I thought that it might be fun to make something specifically for Halloween.


I had some black and white alpaca roving (the same kind as the brown that I used here). 


I started with the white, and felted it into a ghost shape. This is part way through the process:


Then I took three small bits of black roving to felt the eyes and mouth right onto the white part.


Once I was finished, I took a small piece of silver ribbon and sewed it through the back of the ghost near the top, so I could hang it.


It was at that point that inspiration struck (as I was trying to think where exactly I was going to hang this small ghost ornament). I remembered that I had a wreath form that I had gotten ages ago, which was languishing in the back of a drawer in my craft room. And as I was wondering what yarn to use, I remembered this skein of black mohair leftover from a(n unfinished) knitting project. It seemed perfectly Halloween-ish as its texture is rather cobwebby. I also grabbed some sparkly silver pipe cleaners.


I wound the yarn around and around the wreath. I was quite generous with the yarn, and went over the whole thing twice, and I still had probably half the skein left (the wreath form is an 8" one).


When I was done wrapping the yarn around, I partially wove the end in, tied the ghost on, and finished weaving in the end.


Then I started at the top, and wrapped the silver pipe cleaner around, attaching each new one to the previous one at the back. I used 6 pipe cleaners for this. There was just enough of the last pipe cleaner left when I had made my way back up to the top to make a little hoop for hanging:


And there it is! A cute little ghost wreath for Halloween.


I think this would be a fun project to do with kids, too. If you were worried about them needle-felting (depending on their age), the ghost could be cut from regular felt, or you could make those kleenex-ghosts to hang from the middle.


Are you making anything for Halloween?